Frequently Asked Questions
Setup & Installation
How to Setup my Sensor
Once your sensor is installed, the next step is to setup your sensor. To do this, download our Unit Setup app for either iOS or Android to get your sensor connected to the internet and assigned to the correct doorway.
Use the step-by-step guide to easily setup your app once you have the Unit Setup app downloaded on your mobile or tablet device.
Please note: Before setting up the sensor, you will need to first create a space and doorway in the Dashboard.
How do I see if my sensor is counting after installation?
Now that you have connected your sensor to the internet and assigned it to a doorway, you will want to see it in action!
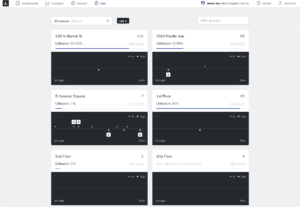
When you login to your Dashboard you may notice that many of the reports are not rendering yet as they rely on multiple days or weeks of data. We recommend using our live count feature to see footfall count in real-time.
To access live count you can either login to the Dashboard or download our mobile app (iOS or Android) to see live occupancy of the space.
If logging into the Dashboard, click Live on the header. From there you will be able to see the live traffic of all connected sensors you have assigned to a doorway. In this view you can filter by space in the search bar at the top left or the drop-down menu at the top right.
How to Install Your Density Sensor
Before installing your sensor, check out our Pre-Installation Assessment Guide to easily determine where and how to mount your sensor. This guide also provides an easy overview of how the sensor counts and things to consider before mounting.
Can I install the Density device outside?
The Density sensor currently does not carry the common design standards for outdoor use, such as the IP67 certification, and is not recommended for outdoor use. In other words, we built the device to live inside in a relative temperature controlled environment. It does not function correctly in rain, snow, extreme heats, etc..